

-

- Over an hour
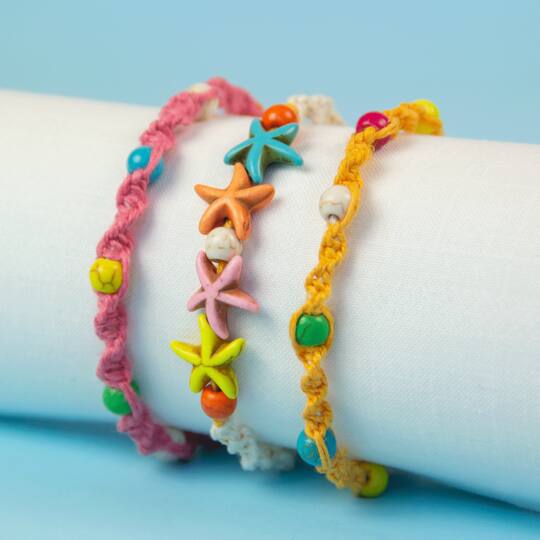
summer twisted bead bracelet stack
| Step 1 |
To make a twisted macramé bracelet, first cut a 72" [183 cm] piece and a 24" [61 cm] piece from one of the natural hemp cords. |
| Step 2 |
At about 5" [12.7 cm] from one end, tie a double overhand knot. |
| Step 3 |
Tape the hemp cord to your working space, above the knot. This will be the base of your bracelet. |
| Step 4 |
Tie the 72" [183 cm] hemp cord around the base cord just below the knot. Make sure the strands on either side of the tie are even. |
| Step 5 |
Slide a bead onto the base and push it up to the tie. |
| Step 6 |
Start your first square knot around the bead. To do this, take the right cord and fold it across the front of the base cord below the bead, horizontally, making the shape of a backward number “4”. |
| Step 7 |
Now, take the left cord and place it over the right cord, bend it back under the right cord and across back of the base cord then up through the opening of the backward “4”. Grab the ends of both cords and pull tight against the metal bead. |
| Step 8 |
For the next 11 knots, repeat Steps 6-7 without a bead. |
| Step 9 |
Slide on a bead and repeat Steps 6-8. Continue this pattern for 6½" [16.5 cm] of knots, or until you reach the desired length. |
| Step 10 |
Tie a double overhand knot with the base cord around the two outside working cords below the last bead. |
| Step 11 |
Trim the ends as close to the knot as you can and add a generous amount of glue. Let dry. |
| Step 12 |
Trim the excess base cord about 5" [12.7 cm] from the double overhand knot. |
| Step 13 |
To tie the sliding knot, overlap the ends of the cords about 2"-3" [5 cm - 7.6 cm]. Tie a knot with the end pointing towards the left, over the lacing. Repeat on the left side. |
| Step 14 |
Tie a knot on each end of the excess cords so the cords do not slip through the sliding knot. |
| Step 15 |
Repeat Steps 1-14 for a second bracelet with a coordinating cord. |
| Step 16 |
For the Starfish bracelet, cut two 36" [91 cm] pieces and a 24" [61 cm] piece from a third a coordinating cord. |
| Step 17 |
Slide starfish and round beads onto the 24" [61 cm] piece and move them to the centre. Tie a double overhand knot on either side to hold them in place. |
| Step 18 |
Fold one 36" [91 cm] piece in half and tie onto one side of the centre beads so there are even lengths on each side of the base cord. |
| Step 19 |
Make straight square knots down this side of the bracelet. To keep the squares straight (and not twist) work Steps 6-8, alternating right to left then left to right (rather than always right to left). |
| Step 20 |
Repeat Steps 18-19 on the other side; then Steps 13-14 for a sliding knot closure. |
-
 You’ll Need: 1Item # 10264568
Promotions
$9.99 -
 You’ll Need: 1Item # 10322295
Promotions
$9.99
Products
Products

- Ruler
- Household (or Painter's) Tape
| Step 1 |
To make a twisted macramé bracelet, first cut a 72" [183 cm] piece and a 24" [61 cm] piece from one of the natural hemp cords. |
| Step 2 |
At about 5" [12.7 cm] from one end, tie a double overhand knot. |
| Step 3 |
Tape the hemp cord to your working space, above the knot. This will be the base of your bracelet. |
| Step 4 |
Tie the 72" [183 cm] hemp cord around the base cord just below the knot. Make sure the strands on either side of the tie are even. |
| Step 5 |
Slide a bead onto the base and push it up to the tie. |
| Step 6 |
Start your first square knot around the bead. To do this, take the right cord and fold it across the front of the base cord below the bead, horizontally, making the shape of a backward number “4”. |
| Step 7 |
Now, take the left cord and place it over the right cord, bend it back under the right cord and across back of the base cord then up through the opening of the backward “4”. Grab the ends of both cords and pull tight against the metal bead. |
| Step 8 |
For the next 11 knots, repeat Steps 6-7 without a bead. |
| Step 9 |
Slide on a bead and repeat Steps 6-8. Continue this pattern for 6½" [16.5 cm] of knots, or until you reach the desired length. |
| Step 10 |
Tie a double overhand knot with the base cord around the two outside working cords below the last bead. |
| Step 11 |
Trim the ends as close to the knot as you can and add a generous amount of glue. Let dry. |
| Step 12 |
Trim the excess base cord about 5" [12.7 cm] from the double overhand knot. |
| Step 13 |
To tie the sliding knot, overlap the ends of the cords about 2"-3" [5 cm - 7.6 cm]. Tie a knot with the end pointing towards the left, over the lacing. Repeat on the left side. |
| Step 14 |
Tie a knot on each end of the excess cords so the cords do not slip through the sliding knot. |
| Step 15 |
Repeat Steps 1-14 for a second bracelet with a coordinating cord. |
| Step 16 |
For the Starfish bracelet, cut two 36" [91 cm] pieces and a 24" [61 cm] piece from a third a coordinating cord. |
| Step 17 |
Slide starfish and round beads onto the 24" [61 cm] piece and move them to the centre. Tie a double overhand knot on either side to hold them in place. |
| Step 18 |
Fold one 36" [91 cm] piece in half and tie onto one side of the centre beads so there are even lengths on each side of the base cord. |
| Step 19 |
Make straight square knots down this side of the bracelet. To keep the squares straight (and not twist) work Steps 6-8, alternating right to left then left to right (rather than always right to left). |
| Step 20 |
Repeat Steps 18-19 on the other side; then Steps 13-14 for a sliding knot closure. |