

-

- Over an hour
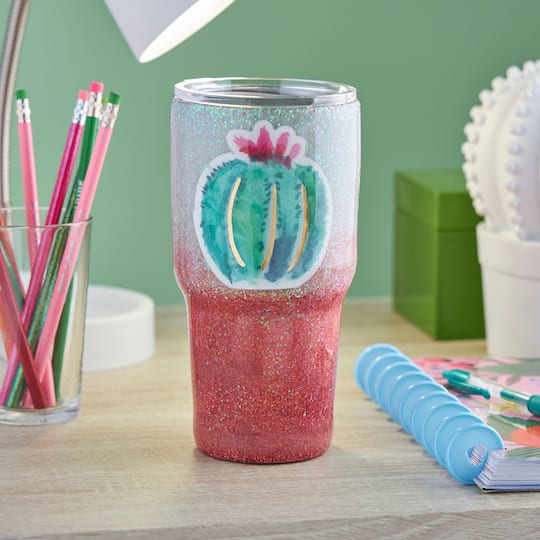
ombré cactus spin-it™ tumbler
| Step 1 |
First, clean your tumbler with rubbing alcohol to remove any fingerprints and/or oils. |
| Step 2 |
Use a foam stippler to pounce an even, generous coat of Mod Podge® to the bottom two-thirds of your tumbler. Hold your tumbler at a 45° angle with the open end facing your working surface. Hold your tumbler over a tray from your prep kit and shake on a generous amount of extra fine glitter around the bottom. Tap the bottom so the excess sprinkles down your tumbler towards the middle. |
| Step 3 |
Shake excess glitter from your tray into an empty cup. Set aside. |
| Step 4 |
Now, repeat Step 2 around the rest of the cup but hold your cup at a 45° angle with the bottom of the tumbler facing your working surface and shake chunky glitter around your tumbler. |
| Step 5 |
Shake excess chunky glitter into the same cup and mix the two glitters. Pour this glitter mixture around the middle to blend. Let dry. |
| Step 6 |
Repeat Steps 2-5, if needed. |
| Step 7 |
Put on a pair of the gloves included in the prep kit and mix epoxy as noted in the directions. Mix only what is needed for one layer at a time. |
| Step 8 |
Place your tumbler onto the Spin It™ Pro-Tumbler. |
| Step 9 |
Turn on the tool to a slow speed and pour a little of your epoxy mixture onto your tumbler. Spread it evenly around and on the bottom of your tumbler. Turn the speed up a little and run your glove-covered fingers over the cup in long even strokes to continue to spread the epoxy evenly. |
| Step 10 |
Turn the tool to the highest speed and allow your tumbler to spin for four hours. |
| Step 11 |
Add your sticker embellishments as desired. |
| Step 12 |
Mix another batch of epoxy (as you did in Step 7) and then repeat Steps 9-10 for a second layer. |
| Step 13 |
After another four hours of spinning, turn off your Spin It™ tool and allow it to cure completely for 24 hours. |
-
 20000797You’ll Need: 1Item # 10406884
Promotions
$4.49- Color: White
- Size: 2 oz
- Color: White
- Size: 2 oz
- Color: White
- Size: 2 oz
-
 You’ll Need: 1Item # 10614446
Promotions
$13.99 -

Products
Products

- Paper Plate (or Palette Paper)
- Paper Towels
- Rubbing Alcohol
| Step 1 |
First, clean your tumbler with rubbing alcohol to remove any fingerprints and/or oils. |
| Step 2 |
Use a foam stippler to pounce an even, generous coat of Mod Podge® to the bottom two-thirds of your tumbler. Hold your tumbler at a 45° angle with the open end facing your working surface. Hold your tumbler over a tray from your prep kit and shake on a generous amount of extra fine glitter around the bottom. Tap the bottom so the excess sprinkles down your tumbler towards the middle. |
| Step 3 |
Shake excess glitter from your tray into an empty cup. Set aside. |
| Step 4 |
Now, repeat Step 2 around the rest of the cup but hold your cup at a 45° angle with the bottom of the tumbler facing your working surface and shake chunky glitter around your tumbler. |
| Step 5 |
Shake excess chunky glitter into the same cup and mix the two glitters. Pour this glitter mixture around the middle to blend. Let dry. |
| Step 6 |
Repeat Steps 2-5, if needed. |
| Step 7 |
Put on a pair of the gloves included in the prep kit and mix epoxy as noted in the directions. Mix only what is needed for one layer at a time. |
| Step 8 |
Place your tumbler onto the Spin It™ Pro-Tumbler. |
| Step 9 |
Turn on the tool to a slow speed and pour a little of your epoxy mixture onto your tumbler. Spread it evenly around and on the bottom of your tumbler. Turn the speed up a little and run your glove-covered fingers over the cup in long even strokes to continue to spread the epoxy evenly. |
| Step 10 |
Turn the tool to the highest speed and allow your tumbler to spin for four hours. |
| Step 11 |
Add your sticker embellishments as desired. |
| Step 12 |
Mix another batch of epoxy (as you did in Step 7) and then repeat Steps 9-10 for a second layer. |
| Step 13 |
After another four hours of spinning, turn off your Spin It™ tool and allow it to cure completely for 24 hours. |