
-

- About 30 minutes
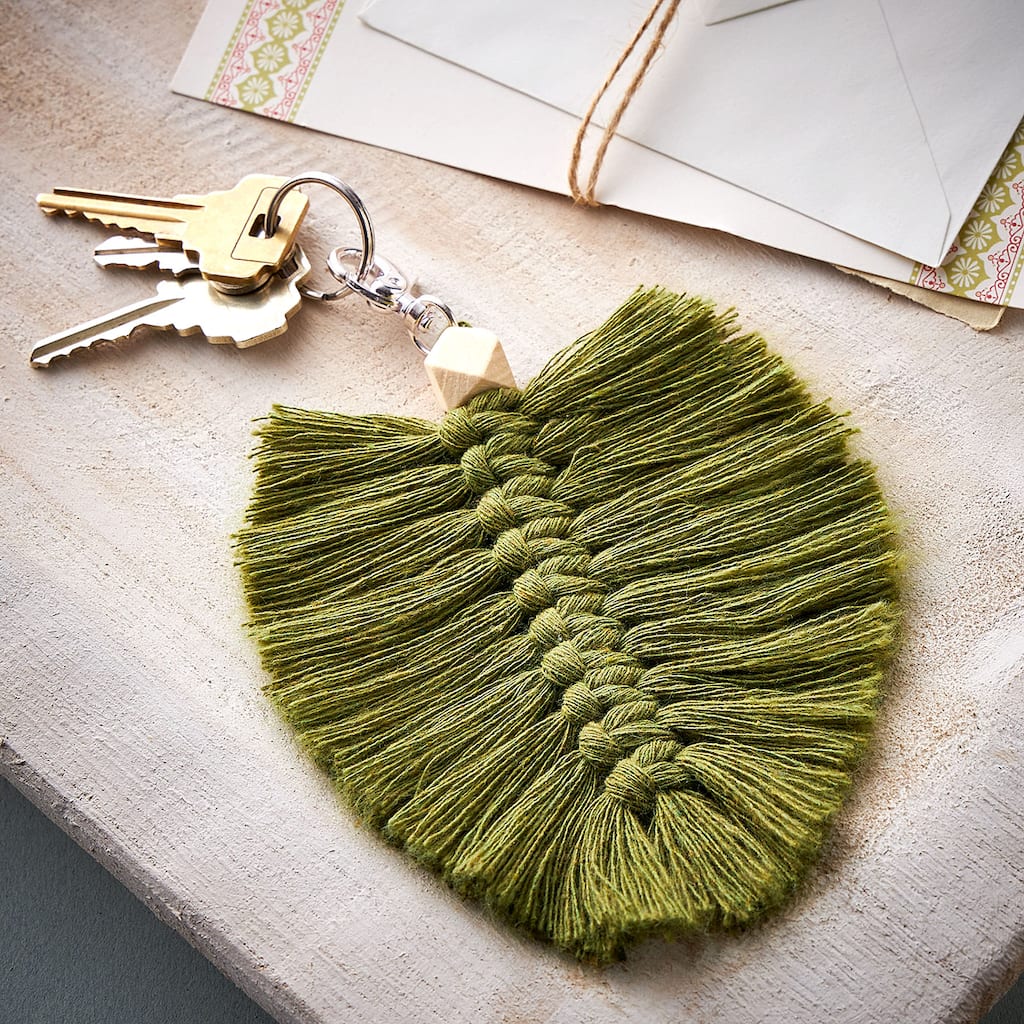
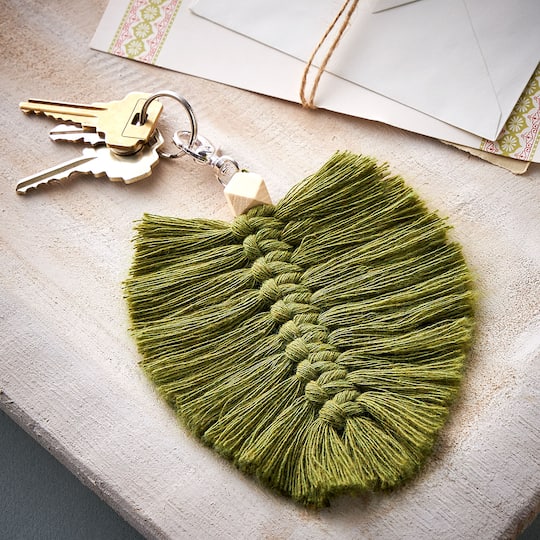
green leaf macrame keychain
| Step 1 |
First, measure and cut the below lengths of macramé cord:
|
| Step 2 |
Thread the 12" [30.45 cm] cord through the loop at the bottom of a clasp and move so it is in the middle of the cord. |
| Step 3 |
Now, slide a wood bead onto both cords hanging down from the clasp and move it up so it rests against the loop on the clasp. |
| Step 4 |
Arrange the cords so they are vertical on your working surface and they are facing towards you. |
| Step 5 |
Fold one of your 6" [15.24 cm] cords in half and align the ends so they are even. Lay it down, horizontally, on your working surface and slide the fold below the vertical cord (in Step 4) so the fold is just to the left of the cords and the ends are pointing out towards the right. |
| Step 6 |
Repeat Step 5 with another 6" [15.2 cm] piece but lay it in the opposite direction on top of the vertical cords from Step 4 and the horizontal cords in Step 6. |
| Step 7 |
Reach in through the fold of the top piece and grab the ends of the piece from the bottom. Pull them up, through the loop. Reach under the fold of the bottom piece and grab the ends from the top. Pull them up, through the loop. |
| Step 8 |
Pull ends and allow the fold of each to slide towards each other until they meet in the middle to form a reef knot. |
| Step 9 |
Repeat Steps 5-8 in the below order:
|
| Step 10 |
Use a comb to brush the horizontal cords and the remaining at the bottom of the vertical cords to make fringe. |
| Step 11 |
Trim and shape into a leaf. |
-
 You’ll Need: 1Item # 10152968
Promotions
$11.99
Products
- Ruler
- 1 - Creations Macramé Cord Spool by Bead Landing™ (SKU 10650779)
- 1 - Creations Rhodium Keychain Components by Bead Landing™ (SKU 10650510)
- 1 - Creations Macramé Comb by Bead Landing™ (SKU 10650523)
- 1 - Creations Wood Mixed Beads by Bead Landing™ (SKU 10650750)
| Step 1 |
First, measure and cut the below lengths of macramé cord:
|
| Step 2 |
Thread the 12" [30.45 cm] cord through the loop at the bottom of a clasp and move so it is in the middle of the cord. |
| Step 3 |
Now, slide a wood bead onto both cords hanging down from the clasp and move it up so it rests against the loop on the clasp. |
| Step 4 |
Arrange the cords so they are vertical on your working surface and they are facing towards you. |
| Step 5 |
Fold one of your 6" [15.24 cm] cords in half and align the ends so they are even. Lay it down, horizontally, on your working surface and slide the fold below the vertical cord (in Step 4) so the fold is just to the left of the cords and the ends are pointing out towards the right. |
| Step 6 |
Repeat Step 5 with another 6" [15.2 cm] piece but lay it in the opposite direction on top of the vertical cords from Step 4 and the horizontal cords in Step 6. |
| Step 7 |
Reach in through the fold of the top piece and grab the ends of the piece from the bottom. Pull them up, through the loop. Reach under the fold of the bottom piece and grab the ends from the top. Pull them up, through the loop. |
| Step 8 |
Pull ends and allow the fold of each to slide towards each other until they meet in the middle to form a reef knot. |
| Step 9 |
Repeat Steps 5-8 in the below order:
|
| Step 10 |
Use a comb to brush the horizontal cords and the remaining at the bottom of the vertical cords to make fringe. |
| Step 11 |
Trim and shape into a leaf. |