

-

- Over an hour
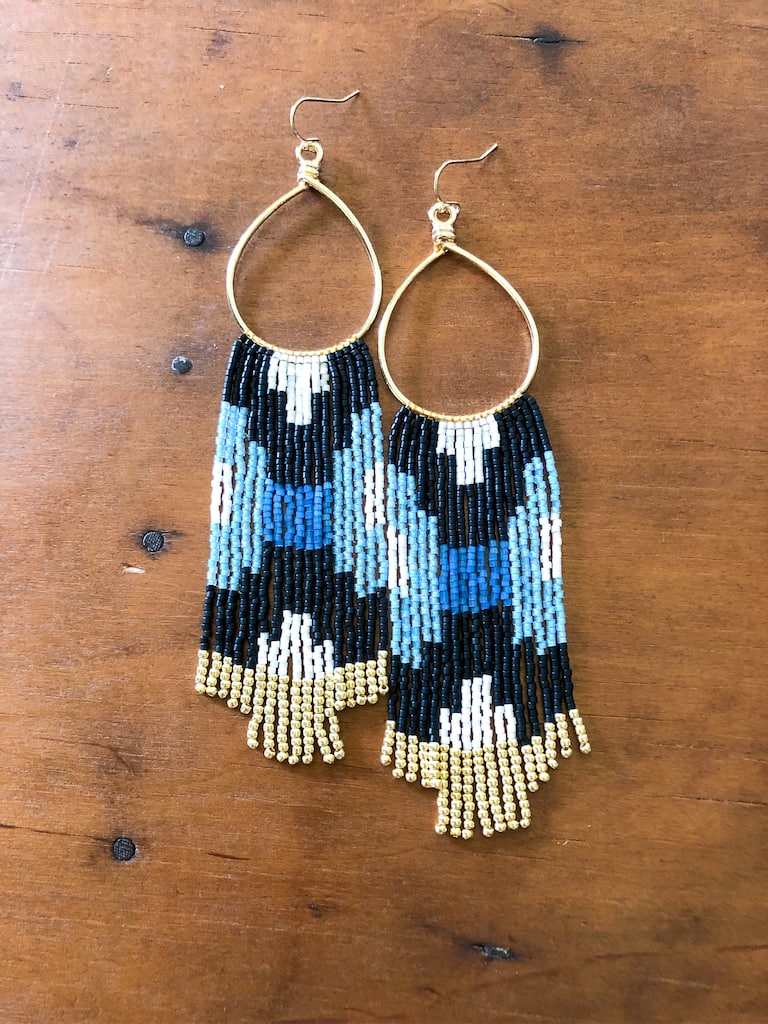
beaded fringe earrings
| Step 1 |
| First, click here to download and print the diagram. |
| Step 2 |
Thread about an arm’s length of thread onto the beading needle. TIP: If you need to add thread during the creation of the woven earring base, simply weave your working thread a few rows back into the brick stitch, crossing over your thread path at least once. Cut the tail as close as possible to beadwork. Reverse this action to weave in a new length of thread. |
| Step 3 |
Follow the provided bead diagram to build your bead pattern. TIP: This pattern has been provided with permission to share by Krysta F. |
| Step 4 |
| Build the first row of your pattern onto the hoop with a brick stitch, leaving about a 4" (10.2 cm) tail. |
| Step 5 |
| Begin creating fringe by stringing all of the beads for the first row onto the thread. Now, loop around the last bead, then double back up through the rest of the beads toward the brick stitch base. Pass back up through the first bead in the base row. Hold the bottom bead in the fringe, pull the working thread up gently until all slack is taken up, and exit down through the next base bead adjacent to the row of fringe you just strung. |
| Step 6 |
Repeat Step 5 until each row of fringe is complete. TIP: Options for adding thread during the creation of the beaded fringe:
|
| Step 7 |
| After the last row of fringe is complete, loop the working thread between the base row and the base bead, knot, and pull tight, ensuring not to create bunching in the last row of fringe. Thread working thread down through 10-15 beads in the last strand of fringe and cut tail as close as possible to beadwork. Repeat with original thread tail. |
| Step 8 |
Repeat for second earring. Share your project photos with #MakeItWithMichaels |
-
 20001577You’ll Need: 1Item # 10474777
Promotions
$5.99- Color: Gold
- Size: 11/0
- Color: Gold
- Size: 11/0
- Color: Gold
- Size: 11/0
-
 20001577You’ll Need: 1Item # 10474833
Promotions
$5.99- Color: Black
- Size: 11/0
- Color: Black
- Size: 11/0
- Color: Black
- Size: 11/0
-
 20001127You’ll Need: 1Item # 10627200
Promotions
$7.99- Color: Luminous Ocean Blue Neon
- Size: 11/0
- Color: Luminous Ocean Blue Neon
- Size: 11/0
- Color: Luminous Ocean Blue Neon
- Size: 11/0
Products
Products


| Step 1 |
| First, click here to download and print the diagram. |
| Step 2 |
Thread about an arm’s length of thread onto the beading needle. TIP: If you need to add thread during the creation of the woven earring base, simply weave your working thread a few rows back into the brick stitch, crossing over your thread path at least once. Cut the tail as close as possible to beadwork. Reverse this action to weave in a new length of thread. |
| Step 3 |
Follow the provided bead diagram to build your bead pattern. TIP: This pattern has been provided with permission to share by Krysta F. |
| Step 4 |
| Build the first row of your pattern onto the hoop with a brick stitch, leaving about a 4" (10.2 cm) tail. |
| Step 5 |
| Begin creating fringe by stringing all of the beads for the first row onto the thread. Now, loop around the last bead, then double back up through the rest of the beads toward the brick stitch base. Pass back up through the first bead in the base row. Hold the bottom bead in the fringe, pull the working thread up gently until all slack is taken up, and exit down through the next base bead adjacent to the row of fringe you just strung. |
| Step 6 |
Repeat Step 5 until each row of fringe is complete. TIP: Options for adding thread during the creation of the beaded fringe:
|
| Step 7 |
| After the last row of fringe is complete, loop the working thread between the base row and the base bead, knot, and pull tight, ensuring not to create bunching in the last row of fringe. Thread working thread down through 10-15 beads in the last strand of fringe and cut tail as close as possible to beadwork. Repeat with original thread tail. |
| Step 8 |
Repeat for second earring. Share your project photos with #MakeItWithMichaels |