


-

- About an hour
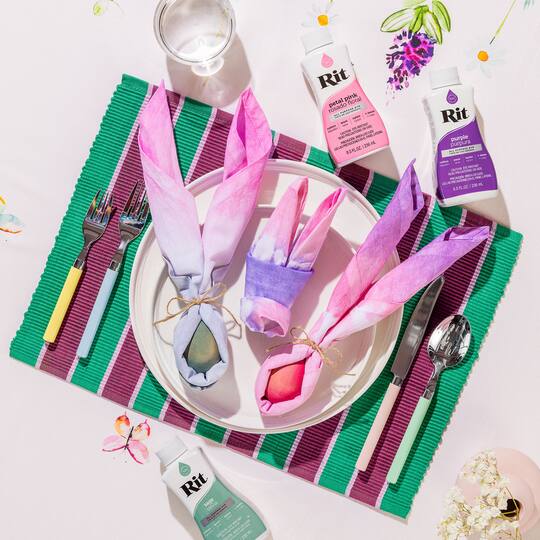
dip dyed easter bunny napkins
Hopping into Spring with these vibrant, hand-dyed napkins inspired by radiant heirloom carrots.
| Step 1 |
Cover your work area with a plastic table cover. |
| Step 2 |
Lay napkin flat on clean surface. |
| Step 3 |
Roughly pleat one corner of the napkin and secure with rubber bands; then repeat to gather on the opposite corner for the “ears” of the bunny. Set aside. |
| Step 4 |
Fill 2-3 small containers with 4 cups of very hot tap water [140°F/60°C]. |
| Step 5 |
Wear rubber gloves and add your dye to water; stir well with a jumbo craft stick. |
| Step 6 |
Add 2 tbsp salt to dyebath; stir well as the salt helps to intensify the dye. |
| Step 7 |
Add a squirt of liquid dish detergent. Stir well. |
| Step 8 |
Test dye by dipping a paper towel into the dyebath. |
| Step 9 |
Fold wet napkin in half so that the two gathered corners align. |
| Step 10 |
Wearing rubber gloves, dip the gathered ends of the napkin into dyebath until you reach the rubber bands. Move the napkin slowly up and down and back and forth. Continue dipping napkin until you are satisfied with the dye. This may take 5-10 minutes. Dye will look darker when wet and prior to washing. |
| Step 11 |
Place wooden Easter eggs into dyebath and stir until desired hue is achieved. Rinse in cool water and let dry. |
| Step 12 |
Repeat to dip dye the opposite end into another dye of your choice. |
| Step 13 |
When satisfied with the outcome, remove napkin from dyebath(s). Wearing rubber gloves, squeeze out excess dye and set napkin aside. Continue dip-dyeing each napkin, one at a time, until all the napkins have been dyed. |
| Step 14 |
Rinse napkins under cold running water until water begins to run clear. Then wash in warm water with mild detergent, rinse and dry. |
| Step 15 |
Once dry, fold and tie to create desired shape. Roll napkins from one corner to another. Place dyed wooden egg at the middle of the rolled napkin and fold over in half. Use twine or ribbon to tie a bow right above the egg to secure. |
-

-

-

-
 Paints Dyes & IronOnsYou’ll Need: 1Item # 10227549
Promotions
$7.99- Color: Purple
- Size: 8 oz
- Color: Purple
- Size: 8 oz
- Color: Purple
- Size: 8 oz
-
 Paints Dyes & IronOnsYou’ll Need: 1Item # 10283668
Promotions
$7.99- Color: Petal Pink
- Size: 8 oz
- Color: Petal Pink
- Size: 8 oz
- Color: Petal Pink
- Size: 8 oz
-
 809188791You’ll Need: 1Item # 10706847
Promotions
$8$19.99clearance- Color: White
- Size: 18" x 18"
clearance- Color: White
- Size: 18" x 18"
- Color: White
- Size: 18" x 18"
*No additional coupons or discounts may be applied. While supplies last. No rain checks. -
 Paints Dyes & IronOnsYou’ll Need: 1Item # 10715653Visit your local store for pricing
- Color: Sage
- Size: 8 oz
- Color: Sage
- Size: 8 oz
- Color: Sage
- Size: 8 oz
Products
Products

- Small Plastic Containers
- Measuring Cup
- Measuring Spoon
- Paper Towels
- Liquid Dish Detergent
- Salt
- Plastic Table Cover
| Step 1 |
Cover your work area with a plastic table cover. |
| Step 2 |
Lay napkin flat on clean surface. |
| Step 3 |
Roughly pleat one corner of the napkin and secure with rubber bands; then repeat to gather on the opposite corner for the “ears” of the bunny. Set aside. |
| Step 4 |
Fill 2-3 small containers with 4 cups of very hot tap water [140°F/60°C]. |
| Step 5 |
Wear rubber gloves and add your dye to water; stir well with a jumbo craft stick. |
| Step 6 |
Add 2 tbsp salt to dyebath; stir well as the salt helps to intensify the dye. |
| Step 7 |
Add a squirt of liquid dish detergent. Stir well. |
| Step 8 |
Test dye by dipping a paper towel into the dyebath. |
| Step 9 |
Fold wet napkin in half so that the two gathered corners align. |
| Step 10 |
Wearing rubber gloves, dip the gathered ends of the napkin into dyebath until you reach the rubber bands. Move the napkin slowly up and down and back and forth. Continue dipping napkin until you are satisfied with the dye. This may take 5-10 minutes. Dye will look darker when wet and prior to washing. |
| Step 11 |
Place wooden Easter eggs into dyebath and stir until desired hue is achieved. Rinse in cool water and let dry. |
| Step 12 |
Repeat to dip dye the opposite end into another dye of your choice. |
| Step 13 |
When satisfied with the outcome, remove napkin from dyebath(s). Wearing rubber gloves, squeeze out excess dye and set napkin aside. Continue dip-dyeing each napkin, one at a time, until all the napkins have been dyed. |
| Step 14 |
Rinse napkins under cold running water until water begins to run clear. Then wash in warm water with mild detergent, rinse and dry. |
| Step 15 |
Once dry, fold and tie to create desired shape. Roll napkins from one corner to another. Place dyed wooden egg at the middle of the rolled napkin and fold over in half. Use twine or ribbon to tie a bow right above the egg to secure. |