
 Print Project

-

- About 30 minutes
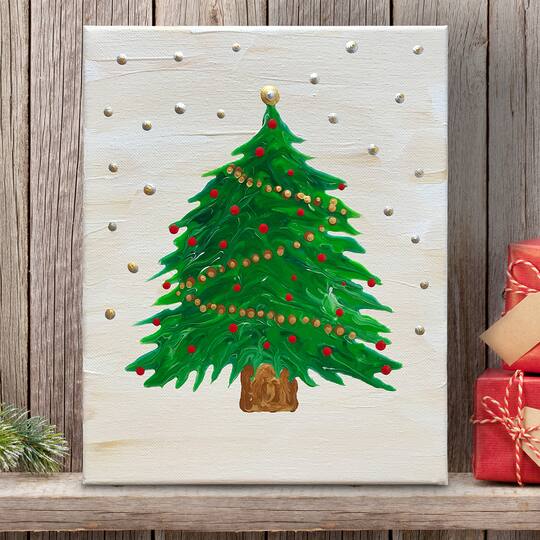
string gel christmas tree canvas art
| Step 1 |
Protect your work surface with paper or plastic covering. |
| Step 2 |
Begin by individually mixing Deep Green Permanent acrylic paint and Light Green Permanent acrylic paint into separate squeeze bottles. The mixing ratio is 2-part string gel, to 1-part acrylic paint. Shake each bottle until the string gel and paint are thoroughly mixed. |
| Step 3 |
Next, use a large flat brush to cover the canvas surface with a coat of Titanium White acrylic paint. Then, take Iridescent Bright Gold acrylic paint and lay down a line on the top, middle and bottom sections of the canvas. Gently brush the gold into the white to add highlights to the canvas background. |
| Step 4 |
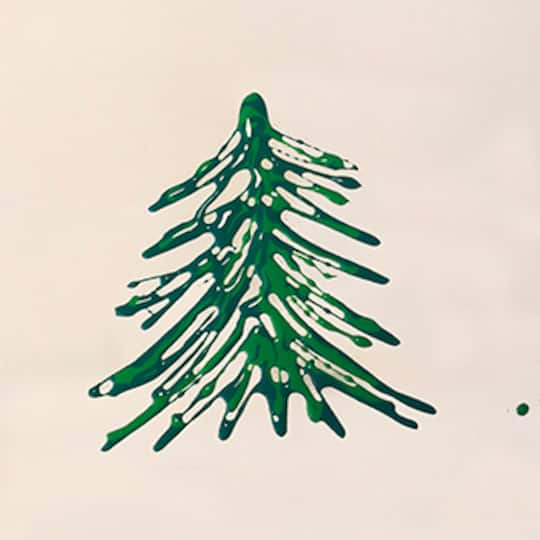
Create the tree outline by using the Deep Green Permanent squeeze bottle mixture. Squeeze the bottle to create the initial outlines of the tree, making it narrow and pointed at the top, and wider at the bottom. Next, add lines of the Light Green Permanent squeeze bottle mixture inside and on top of the Deep Green Permanent outline. |
| Step 5 |
Fill in body of the tree by alternating between the Deep Green Permanent and Light Green Permanent mixtures, squeeze several more lines into the body of the tree until you see the lines begin to touch and blend, or until you no longer see the white background. |
| Step 6 |
With a palette knife, begin to create stroke marks in the body of the tree by starting in the centre and moving outward to the outline of the tree. This will help swirl the greens to create a marbling effect. Once the paint inside the tree is mixed and swirled to the desired pattern, begin to pull the paint from the outline of the tree outward to create individual branches and branch layers. Be sure to pull paint out from the bottom of the tree as well. |
| Step 7 |
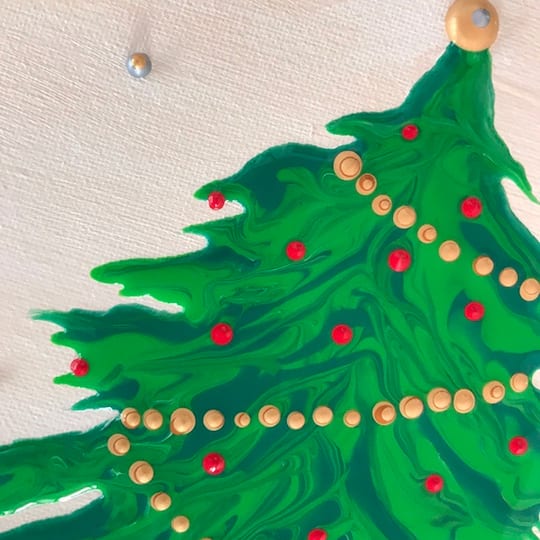
Next, create the stars in the background. Using the tapered nozzle on bottle, add small, sporadic dots to the top and sides of your canvas surrounding the tree by squeezing the bottle to apply Iridescent Bright Silver. Once complete, add secondary, smaller dots of Iridescent Bright Gold on top of your Iridescent Bright Silver dots to add highlighting. |
| Step 8 |
Using the tapered nozzle on bottle, lay down small dots by squeezing the bottle to apply Raw Sienna to create the strands of garland strung across the tree, starting from the top and working towards the bottom. Once complete, add secondary, smaller dots of Iridescent Bright Gold on top of your Raw Sienna dots to add highlighting. |
| Step 9 |
Using the tapered nozzle on bottle, add sporadic dots inside the tree and onto the branch layers to create the ornaments by squeezing the bottle of Cad-Free Red Medium. |
| Step 10 |
Using the tapered nozzle on bottle, add a large dot to the top of the tree by squeezing the bottle to apply Iridescent Bright Gold. Next, use the Iridescent Bright Silver acrylic paint to put a smaller dot on top of the gold dot to add highlighting to the tree topper. |
| Step 11 |
Using the tapered nozzle on bottle, outline 3 sides of a vertical rectangular shape to form the base, at the bottom, middle of the tree by squeezing the bottle to apply Raw Sienna acrylic paint. Add several lines of Iridescent Bright Gold to fill the inside of the base. Take a palette knife and begin to swirl the Raw Sienna and Iridescent Gold together to get a marbled effect to fill in and form the finished shape of the tree base. |
| Step 12 |
Once complete, allow to dry for 24 hours. |
-

-
 845162822You’ll Need: 1Item # 10672204
Promotions
$9.99- Color: White
- Size: 8" x 10"
- Color: White
- Size: 8" x 10"
- Color: White
- Size: 8" x 10"
-
 832736761You’ll Need: 1Item # 10410868
Promotions
$4.99- Color: White
- Size: 54" x 108"
- Color: White
- Size: 54" x 108"
- Color: White
- Size: 54" x 108"
-
 845161011You’ll Need: 1Item # 10013657
Promotions
$11.99- Color: Titanium White
- Size: 2 oz
- Color: Titanium White
- Size: 2 oz
- Color: Titanium White
- Size: 2 oz
Products
 Tools
Tools
Tools
Tools
Products


 You’ll Also Need
- Liquitex® Professional Soft Body Acrylic Bottle – Deep Green Permanent (D249119S)
- Liquitex® Professional Soft Body Acrylic Bottle – Light Green Permanent (D249146S)
- Liquitex® Professional Soft Body Acrylic Bottle – Iridescent Bright Silver (D249136S)
- Liquitex® Professional Soft Body Acrylic Bottle – Iridescent Bright Gold (D249137S)
- Liquitex® Professional Soft Body Acrylic Bottle – Cad Free Red Medium (D249386S)
- Liquitex® Professional Soft Body Acrylic Bottle – Raw Sienna (D249175S)
- Liquitex® String Gel Medium (D241424S)
- Funnel (Optional)
| Step 1 |
Protect your work surface with paper or plastic covering. |
| Step 2 |
Begin by individually mixing Deep Green Permanent acrylic paint and Light Green Permanent acrylic paint into separate squeeze bottles. The mixing ratio is 2-part string gel, to 1-part acrylic paint. Shake each bottle until the string gel and paint are thoroughly mixed. |
| Step 3 |
Next, use a large flat brush to cover the canvas surface with a coat of Titanium White acrylic paint. Then, take Iridescent Bright Gold acrylic paint and lay down a line on the top, middle and bottom sections of the canvas. Gently brush the gold into the white to add highlights to the canvas background. |
| Step 4 |
Create the tree outline by using the Deep Green Permanent squeeze bottle mixture. Squeeze the bottle to create the initial outlines of the tree, making it narrow and pointed at the top, and wider at the bottom. Next, add lines of the Light Green Permanent squeeze bottle mixture inside and on top of the Deep Green Permanent outline. |
| Step 5 |
Fill in body of the tree by alternating between the Deep Green Permanent and Light Green Permanent mixtures, squeeze several more lines into the body of the tree until you see the lines begin to touch and blend, or until you no longer see the white background. |
| Step 6 |
With a palette knife, begin to create stroke marks in the body of the tree by starting in the centre and moving outward to the outline of the tree. This will help swirl the greens to create a marbling effect. Once the paint inside the tree is mixed and swirled to the desired pattern, begin to pull the paint from the outline of the tree outward to create individual branches and branch layers. Be sure to pull paint out from the bottom of the tree as well. |
| Step 7 |
Next, create the stars in the background. Using the tapered nozzle on bottle, add small, sporadic dots to the top and sides of your canvas surrounding the tree by squeezing the bottle to apply Iridescent Bright Silver. Once complete, add secondary, smaller dots of Iridescent Bright Gold on top of your Iridescent Bright Silver dots to add highlighting. |
| Step 8 |
Using the tapered nozzle on bottle, lay down small dots by squeezing the bottle to apply Raw Sienna to create the strands of garland strung across the tree, starting from the top and working towards the bottom. Once complete, add secondary, smaller dots of Iridescent Bright Gold on top of your Raw Sienna dots to add highlighting. |
| Step 9 |
Using the tapered nozzle on bottle, add sporadic dots inside the tree and onto the branch layers to create the ornaments by squeezing the bottle of Cad-Free Red Medium. |
| Step 10 |
Using the tapered nozzle on bottle, add a large dot to the top of the tree by squeezing the bottle to apply Iridescent Bright Gold. Next, use the Iridescent Bright Silver acrylic paint to put a smaller dot on top of the gold dot to add highlighting to the tree topper. |
| Step 11 |
Using the tapered nozzle on bottle, outline 3 sides of a vertical rectangular shape to form the base, at the bottom, middle of the tree by squeezing the bottle to apply Raw Sienna acrylic paint. Add several lines of Iridescent Bright Gold to fill the inside of the base. Take a palette knife and begin to swirl the Raw Sienna and Iridescent Gold together to get a marbled effect to fill in and form the finished shape of the tree base. |
| Step 12 |
Once complete, allow to dry for 24 hours. |