
 Print Project
-

- About 30 minutes
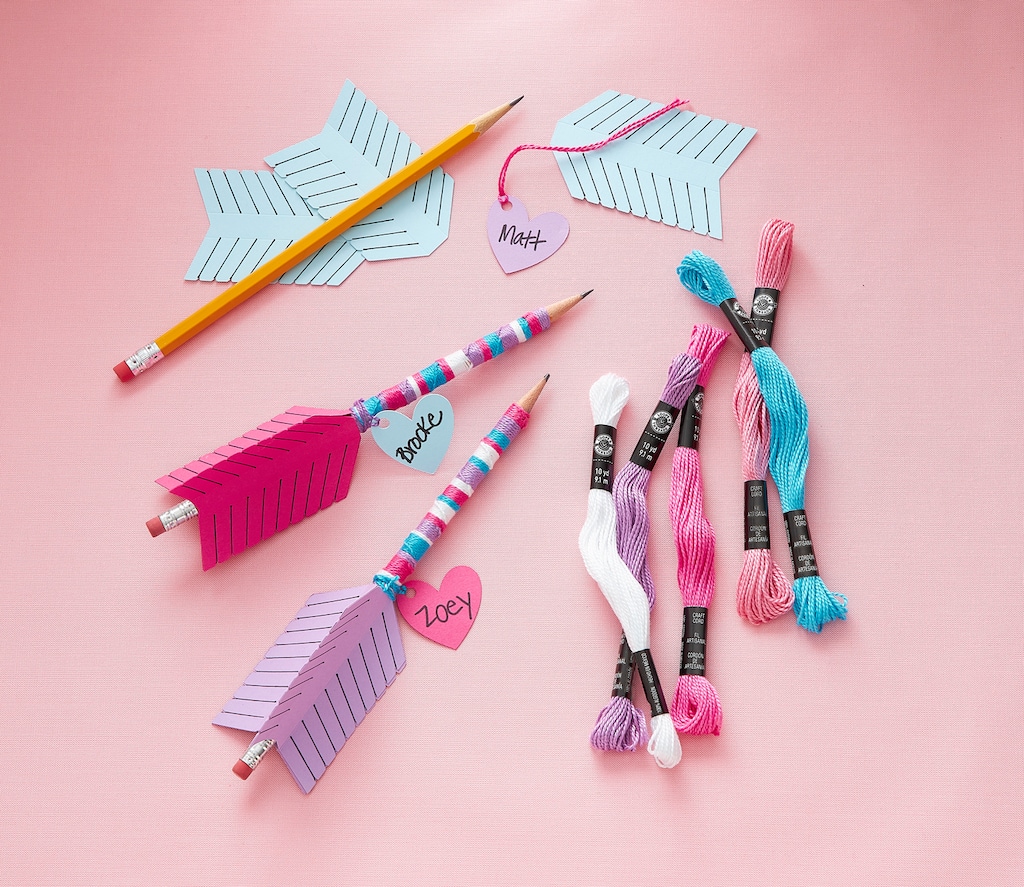
kids valentine's day feather pencil
| Step 1 |
ADULT: First, click here for the design in Cricut® Design Space™ and cut feather shapes from cardstock. |
| Step 2 |
Use a ruler and a marker to draw a line over the diagonal score line between the outside notch that runs down to the vertical score line. |
| Step 3 |
Fold along the vertical score lines and set aside. |
| Step 4 |
Measure and cut 48" [121.9 cm] from four craft cord skeins. Lay them flat onto your working surface and align the ends. |
| Step 5 |
Tie one end of the cords onto a pencil and slide it up to about 3¼" [8.2 cm] from the eraser end. Add a little glue just above the tied cords and smooth the excess ends against the pencil. |
| Step 6 |
Now, use a glue stick to attach the feather pieces to the pencil above where you attached the cords. |
| Step 7 |
Choose a cord colour for your first stripe. Hold the other three colours against the pencil and work backward overhand knots down your first colour until you get the length desired for your first stripe. |
| Step 8 |
To change colours, set down the working cord and pick up the next colour; then continue knotting. Repeat, alternating colours, until you get to the end of your pencil. |
| Step 9 |
Tie a knot in the last colour. Trim ends and place a little glue over the ends and smooth to your pencil. |
-
 You’ll Need: 1Item # 10406404
Promotions
$11.99 -

Products
 You’ll Also Need
- Computer
- Ruler
- Pencil
| Step 1 |
ADULT: First, click here for the design in Cricut® Design Space™ and cut feather shapes from cardstock. |
| Step 2 |
Use a ruler and a marker to draw a line over the diagonal score line between the outside notch that runs down to the vertical score line. |
| Step 3 |
Fold along the vertical score lines and set aside. |
| Step 4 |
Measure and cut 48" [121.9 cm] from four craft cord skeins. Lay them flat onto your working surface and align the ends. |
| Step 5 |
Tie one end of the cords onto a pencil and slide it up to about 3¼" [8.2 cm] from the eraser end. Add a little glue just above the tied cords and smooth the excess ends against the pencil. |
| Step 6 |
Now, use a glue stick to attach the feather pieces to the pencil above where you attached the cords. |
| Step 7 |
Choose a cord colour for your first stripe. Hold the other three colours against the pencil and work backward overhand knots down your first colour until you get the length desired for your first stripe. |
| Step 8 |
To change colours, set down the working cord and pick up the next colour; then continue knotting. Repeat, alternating colours, until you get to the end of your pencil. |
| Step 9 |
Tie a knot in the last colour. Trim ends and place a little glue over the ends and smooth to your pencil. |