

-

- About 30 minutes
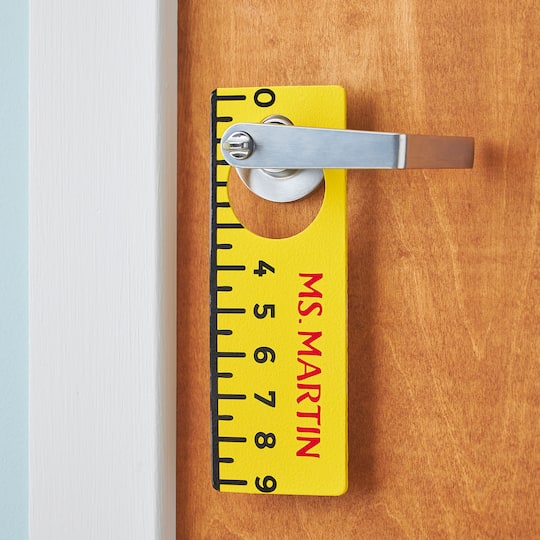
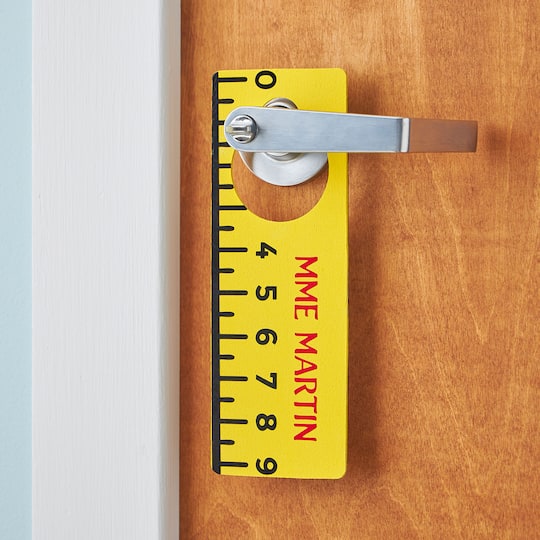
teacher ruler door hanger
| Step 1 |
Paint a wooden door hanger using the bright yellow paint. Let dry. Repeat on the backside and let dry. |
| Step 2 |
Click here for the design in Cricut® Design Space™. |
| Step 3 |
Choose a font to create the name you would like to add to your ruler door hanger. Use the names provided in the design as a guide then delete before you move to the preview screen. |
| Step 4 |
Now, click ‘Make It’ in the upper right corner and then click ‘Continue’ in the lower right corner of your screen. |
| Step 5 |
Select your material, place Smart Vinyl™ in the loading area and your machine will pull it in to prepare for your cut. Follow the prompts to cut out your design. |
| Step 6 |
Use the weeder tool to peel away the excess material of the design. Only the design itself should be left on the backer paper. |
| Step 7 |
Cut a piece of transfer tape a little larger than the designs. Peel away the tape’s backer paper and place the tape, sticky-side down, over your design. Burnish the vinyl so that it’s completely stuck to the tape. |
| Step 8 |
Now, gently peel the white backer paper from the cut-out design, which now should be stuck to the transfer tape. |
| Step 9 |
Position the ruler design over the painted yellow door hanger, then carefully transfer them by burnishing and peeling away the vinyl. |
| Step 10 |
Use scissors to cut the excess pieces of the vinyl from the ends and the knob hole. |
| Step 11 |
Position the name above the ruler, then carefully transfer them by burnishing and peeling away the vinyl. |
-
 926203319You’ll Need: 1Item # 10402501
Promotions
$1.49- Color: Bright Yellow
- Size: 2 oz
- Color: Bright Yellow
- Size: 2 oz
- Color: Bright Yellow
- Size: 2 oz
-
 20000586You’ll Need: 1Item # 10628840$8.99
- Color: Black
- Size: 5.5" x 48"
- Color: Black
- Size: 5.5" x 48"
- Color: Black
- Size: 5.5" x 48"
-
 20000586You’ll Need: 1Item # 10628851$8.99
- Color: Tomato Red
- Size: 5.5" x 48"
- Color: Tomato Red
- Size: 5.5" x 48"
- Color: Tomato Red
- Size: 5.5" x 48"
-

Products
-

-

-
 20000939You’ll Need: 1Item # 10604223
Promotions
$0.99- Color: Black
- Size: 1 in
- Color: Black
- Size: 1 in
- Color: Black
- Size: 1 in
-

Products
- Computer
- 1 - Cricut® Weeder Tool (D032589S)
- 1 - Cricut Joy™ Machine (D353373S)
| Step 1 |
Paint a wooden door hanger using the bright yellow paint. Let dry. Repeat on the backside and let dry. |
| Step 2 |
Click here for the design in Cricut® Design Space™. |
| Step 3 |
Choose a font to create the name you would like to add to your ruler door hanger. Use the names provided in the design as a guide then delete before you move to the preview screen. |
| Step 4 |
Now, click ‘Make It’ in the upper right corner and then click ‘Continue’ in the lower right corner of your screen. |
| Step 5 |
Select your material, place Smart Vinyl™ in the loading area and your machine will pull it in to prepare for your cut. Follow the prompts to cut out your design. |
| Step 6 |
Use the weeder tool to peel away the excess material of the design. Only the design itself should be left on the backer paper. |
| Step 7 |
Cut a piece of transfer tape a little larger than the designs. Peel away the tape’s backer paper and place the tape, sticky-side down, over your design. Burnish the vinyl so that it’s completely stuck to the tape. |
| Step 8 |
Now, gently peel the white backer paper from the cut-out design, which now should be stuck to the transfer tape. |
| Step 9 |
Position the ruler design over the painted yellow door hanger, then carefully transfer them by burnishing and peeling away the vinyl. |
| Step 10 |
Use scissors to cut the excess pieces of the vinyl from the ends and the knob hole. |
| Step 11 |
Position the name above the ruler, then carefully transfer them by burnishing and peeling away the vinyl. |