

-

- Over an hour
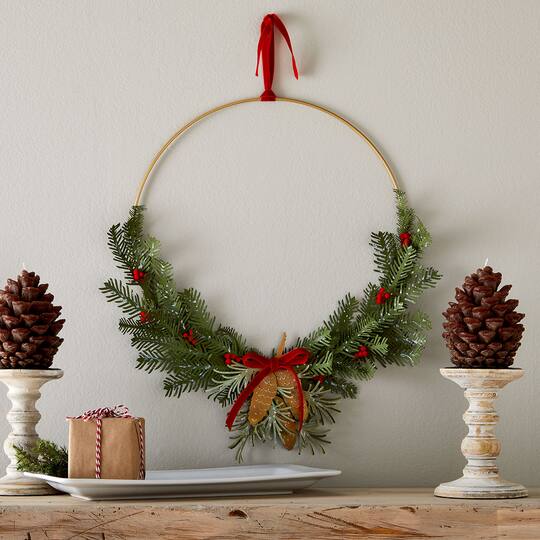
paper pine cone christmas wreath
| Step 1 |
First, click here for the link in Cricut® Design Space™ to cut out the pieces for your wreath. Cut out as many pine needles and berries as you would like the wreath full and set them aside. |
| Step 2 |
Use your fingers and a pencil to slightly curve the pine needles. Glue them in layers to the base of the wire wreath. |
| Step 3 |
Add a cluster of paper pine needles to the bottom of the wreath and place the paper pine cones on top gluing them in place. |
| Step 4 |
Tuck in the paper berries and glue in place. |
| Step 5 |
Glue mini pom-poms on top of the paper berries to add dimension and texture. |
| Step 6 |
Tie a velvet ribbon bow and glue it over the pine cones. Cut a piece of the velvet ribbon and tie it to the top of the wreath to work as a hanger. |
| Step 7 |
Finish the wreath by adding glitter glue to the tips of the pine needles and the pine cones. |
-
 809188527You’ll Need: 1Item # 10151266
Promotions
$1.29ea.- Color: King Gold
- Size: 12" x 12"
- Color: King Gold
- Size: 12" x 12"
- Color: King Gold
- Size: 12" x 12"
-
 809188527You’ll Need: 4Item # 10151264
Promotions
$1.29ea.- Color: Dill
- Size: 12" x 12"
- Color: Dill
- Size: 12" x 12"
- Color: Dill
- Size: 12" x 12"
Products
Products

- 1 - 3/8" Velvet Narrow Ribbon by Celebrate It™ Christmas (SKU 10633600)
- 1 - 14" Gold Metal Wire Floral Hoop by Ashland® (SKU 10626550)
- 1 - Stickles™ Glitter Glue, Mettalix (SKU 10999259)
| Step 1 |
First, click here for the link in Cricut® Design Space™ to cut out the pieces for your wreath. Cut out as many pine needles and berries as you would like the wreath full and set them aside. |
| Step 2 |
Use your fingers and a pencil to slightly curve the pine needles. Glue them in layers to the base of the wire wreath. |
| Step 3 |
Add a cluster of paper pine needles to the bottom of the wreath and place the paper pine cones on top gluing them in place. |
| Step 4 |
Tuck in the paper berries and glue in place. |
| Step 5 |
Glue mini pom-poms on top of the paper berries to add dimension and texture. |
| Step 6 |
Tie a velvet ribbon bow and glue it over the pine cones. Cut a piece of the velvet ribbon and tie it to the top of the wreath to work as a hanger. |
| Step 7 |
Finish the wreath by adding glitter glue to the tips of the pine needles and the pine cones. |