

-

- About 30 minutes
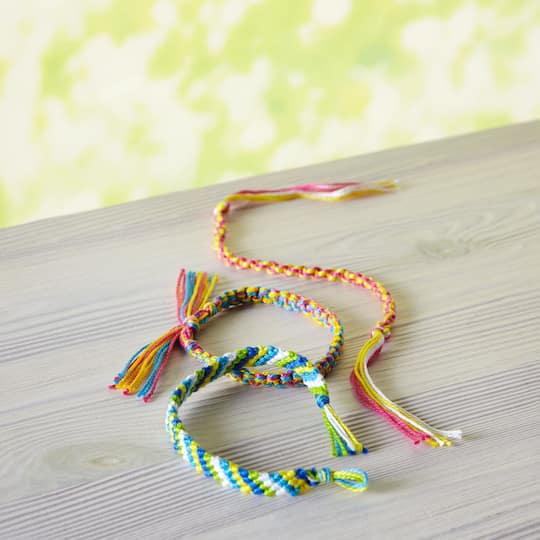
friendship bracelet
| Step 1 |
Project Note: The measurements in the instructions are based on a 7" [17.78 cm] wrist. Adjust lengths of floss cord as needed. |
| Step 2 |
Gather cords together and tie a small loop at one end. Pull knot tight to secure. |
| Step 3 |
Separate the cords into three sections. Pink on the right, white in the centre and yellow on the left. |
| Step 4 |
Use a small piece of masking tape to tape the loop down onto your work surface. Place another length of tape about 9" [22.86 cm] from the top loop to hold the white centre cords together on the work surface. This will keep the cords from moving while knotting. The right side and left cords are the “working” cords that will do all the knotting, while the centre cords or “anchor” cords hold the bracelet together and keep the knots anchored together. |
| Step 5 |
To start the knotting process, place the pink (right) cords perpendicular under the white anchor cords and over the top of the yellow cords. |
| Step 6 |
Place the yellow cords over the top of the white cords and then under the pink cords. Pull the yellow and pink cords from the bottom to form a knot at the top. |
| Step 7 |
To create a twist, continue the knotting process using the same side of cords (the right side) as the lead “working” cords. Soon the cords will begin to twist. By only knotting on one side, the twist will start to form. |
| Step 8 |
Once you have several inches in length of twist knots, hold the bracelet up to your wrist to measure the length. Continue to knot until desired length is achieved. |
| Step 9 |
| Leave a 1½" [3.81 cm] tail at each end and tie a double knot to secure cords. Trim excess cord with scissors. Loop double knot through loop to wear. Share your project photos with #MakeItWithMichaels |
Products


- Ruler (or Tape Measuring)
- Clipboard (Optional)
| Step 1 |
Project Note: The measurements in the instructions are based on a 7" [17.78 cm] wrist. Adjust lengths of floss cord as needed. |
| Step 2 |
Gather cords together and tie a small loop at one end. Pull knot tight to secure. |
| Step 3 |
Separate the cords into three sections. Pink on the right, white in the centre and yellow on the left. |
| Step 4 |
Use a small piece of masking tape to tape the loop down onto your work surface. Place another length of tape about 9" [22.86 cm] from the top loop to hold the white centre cords together on the work surface. This will keep the cords from moving while knotting. The right side and left cords are the “working” cords that will do all the knotting, while the centre cords or “anchor” cords hold the bracelet together and keep the knots anchored together. |
| Step 5 |
To start the knotting process, place the pink (right) cords perpendicular under the white anchor cords and over the top of the yellow cords. |
| Step 6 |
Place the yellow cords over the top of the white cords and then under the pink cords. Pull the yellow and pink cords from the bottom to form a knot at the top. |
| Step 7 |
To create a twist, continue the knotting process using the same side of cords (the right side) as the lead “working” cords. Soon the cords will begin to twist. By only knotting on one side, the twist will start to form. |
| Step 8 |
Once you have several inches in length of twist knots, hold the bracelet up to your wrist to measure the length. Continue to knot until desired length is achieved. |
| Step 9 |
| Leave a 1½" [3.81 cm] tail at each end and tie a double knot to secure cords. Trim excess cord with scissors. Loop double knot through loop to wear. Share your project photos with #MakeItWithMichaels |