


-

- About an hour
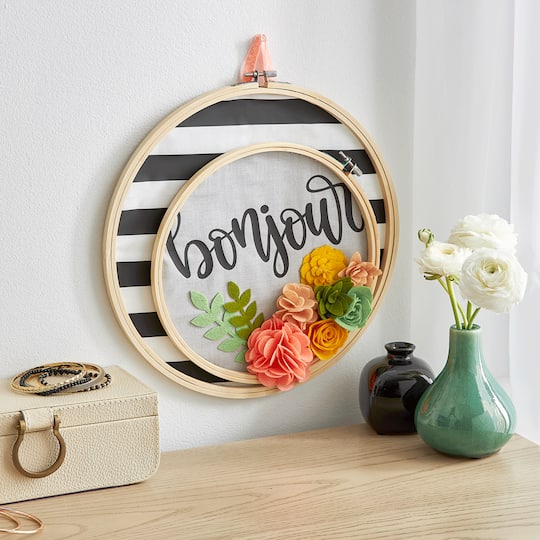
embroidery hoop hello sign
| Step 1 |
First, click here for the design in Cricut® Design Space™. |
| Step 2 |
Click ‘Make It’ in the upper right corner of your screen. |
| Step 3 |
In your preview screen, check ‘Mirror’ in the left panel below the black mats to reverse the images. |
| Step 4 |
Now, click ‘Continue’ in the bottom right corner of your screen and choose your material. |
| Step 5 |
Place the iron-on material, shiny-side down, onto your cutting mat. Load the mat into your Cricut® machine, then press the blinking Cricut® icon to start cutting. |
| Step 6 |
Once your machine is done cutting each layer, use scissors to cut your design from the iron-on material roll. Next, use your weeder tool to remove all the excess material around and inside your design. You’ll be left with just the reversed design on the clear plastic carrier sheets, which are slightly sticky. |
| Step 7 |
Place your first felt sheet onto your cutting mat. Change the material to ‘Felt’. |
| Step 8 |
Repeat Step 7 for each felt colour. Set felt pieces aside. |
| Step 9 |
Preheat your EasyPress™ to the appropriate temperature for your material and, if needed, adjust the timer. |
| Step 10 |
Place your white fabric piece on top of your EasyPress™ mat and then preheat the fabric for 5 seconds. |
| Step 11 |
Place the carrier sheet with the stripes, so it’s sticky-side down, and place it onto the fabric. You should be able to see the layer through the carrier sheet, just as it will appear once ironed. |
| Step 12 |
Place your EasyPress™ on top of the design, apply the appropriate pressure for your material, and press the time button. Once it beeps, flip over your shirt and press for another 15 seconds. Carefully peel off the carrier sheet. |
| Step 13 |
Repeat Steps 10-12 for your grey fabric and “hello” design. |
| Step 14 |
Now, assemble the flowers. For the small yellow succulent, run the Moss Green ink pad over the edges of each piece. Use hot glue to layer all of the pieces from the larger piece up to smallest. |
| Step 15 |
For the large pink flower, fold five pieces in half and add a little glue to hold in place. Fold the half in half and again, add a little glue. Glue four of the folded flower pieces on top of the sixth flower shape. Glue the fifth, scalloped side facing up, in the centre of the four. Set aside. |
| Step 16 |
For all other flowers, starting from the outer end, roll the felt around the “coiled” flower shape until you get to the centre circle. Add a little hot glue to the felt as you roll.; then add a fair amount of hot glue to the circle and push the rolled flower into the hot glue. Let the glue cool. Set the felt flowers aside. |
| Step 17 |
Disassemble each embroidery hoop and set the outer parts aside for now. |
| Step 18 |
Place the inner hoop of the larger one over the iron-on striped white fabric and trace the circle with a marking pencil. Repeat with the smaller inner hoop on the grey fabric. |
| Step 19 |
Cut out the circles. |
| Step 20 |
Working in small sections at a time, add a line of hot glue to the side of the inner embroidery hoops and attach the fabric circles to the hoops. |
| Step 21 |
Re-assemble the outer hoops around the inner hoops (with fabric attached). |
| Step 22 |
Hot glue the smaller “hello” embroidery hoop to the front of the striped hoop over the open space. |
| Step 23 |
Hot glue the felt leaves and flowers to the front of the grey fabric on the smaller hoop, below the “hello”. |
| Step 24 |
Finally, turn over and hot glue the pink tab to the back of the outer hoop to use as a hanger. |
-

-

-
 809188574You’ll Need: 1Item # 10416359
Promotions
$13.99- Color: Moss Green
- Color: Moss Green
- Color: Moss Green
-
 888737850You’ll Need: 1Item # 10411616
Promotions
$2.49- Color: White
- Size: 18" x 21"
- Color: White
- Size: 18" x 21"
- Color: White
- Size: 18" x 21"
Products
-
 853466675You’ll Need: 1Item # 10124157
Promotions
$3.99- Size: 9 in
- Size: 9 in
- Size: 9 in
-

-

Products
- Computer
| Step 1 |
First, click here for the design in Cricut® Design Space™. |
| Step 2 |
Click ‘Make It’ in the upper right corner of your screen. |
| Step 3 |
In your preview screen, check ‘Mirror’ in the left panel below the black mats to reverse the images. |
| Step 4 |
Now, click ‘Continue’ in the bottom right corner of your screen and choose your material. |
| Step 5 |
Place the iron-on material, shiny-side down, onto your cutting mat. Load the mat into your Cricut® machine, then press the blinking Cricut® icon to start cutting. |
| Step 6 |
Once your machine is done cutting each layer, use scissors to cut your design from the iron-on material roll. Next, use your weeder tool to remove all the excess material around and inside your design. You’ll be left with just the reversed design on the clear plastic carrier sheets, which are slightly sticky. |
| Step 7 |
Place your first felt sheet onto your cutting mat. Change the material to ‘Felt’. |
| Step 8 |
Repeat Step 7 for each felt colour. Set felt pieces aside. |
| Step 9 |
Preheat your EasyPress™ to the appropriate temperature for your material and, if needed, adjust the timer. |
| Step 10 |
Place your white fabric piece on top of your EasyPress™ mat and then preheat the fabric for 5 seconds. |
| Step 11 |
Place the carrier sheet with the stripes, so it’s sticky-side down, and place it onto the fabric. You should be able to see the layer through the carrier sheet, just as it will appear once ironed. |
| Step 12 |
Place your EasyPress™ on top of the design, apply the appropriate pressure for your material, and press the time button. Once it beeps, flip over your shirt and press for another 15 seconds. Carefully peel off the carrier sheet. |
| Step 13 |
Repeat Steps 10-12 for your grey fabric and “hello” design. |
| Step 14 |
Now, assemble the flowers. For the small yellow succulent, run the Moss Green ink pad over the edges of each piece. Use hot glue to layer all of the pieces from the larger piece up to smallest. |
| Step 15 |
For the large pink flower, fold five pieces in half and add a little glue to hold in place. Fold the half in half and again, add a little glue. Glue four of the folded flower pieces on top of the sixth flower shape. Glue the fifth, scalloped side facing up, in the centre of the four. Set aside. |
| Step 16 |
For all other flowers, starting from the outer end, roll the felt around the “coiled” flower shape until you get to the centre circle. Add a little hot glue to the felt as you roll.; then add a fair amount of hot glue to the circle and push the rolled flower into the hot glue. Let the glue cool. Set the felt flowers aside. |
| Step 17 |
Disassemble each embroidery hoop and set the outer parts aside for now. |
| Step 18 |
Place the inner hoop of the larger one over the iron-on striped white fabric and trace the circle with a marking pencil. Repeat with the smaller inner hoop on the grey fabric. |
| Step 19 |
Cut out the circles. |
| Step 20 |
Working in small sections at a time, add a line of hot glue to the side of the inner embroidery hoops and attach the fabric circles to the hoops. |
| Step 21 |
Re-assemble the outer hoops around the inner hoops (with fabric attached). |
| Step 22 |
Hot glue the smaller “hello” embroidery hoop to the front of the striped hoop over the open space. |
| Step 23 |
Hot glue the felt leaves and flowers to the front of the grey fabric on the smaller hoop, below the “hello”. |
| Step 24 |
Finally, turn over and hot glue the pink tab to the back of the outer hoop to use as a hanger. |