
-

- Over an hour
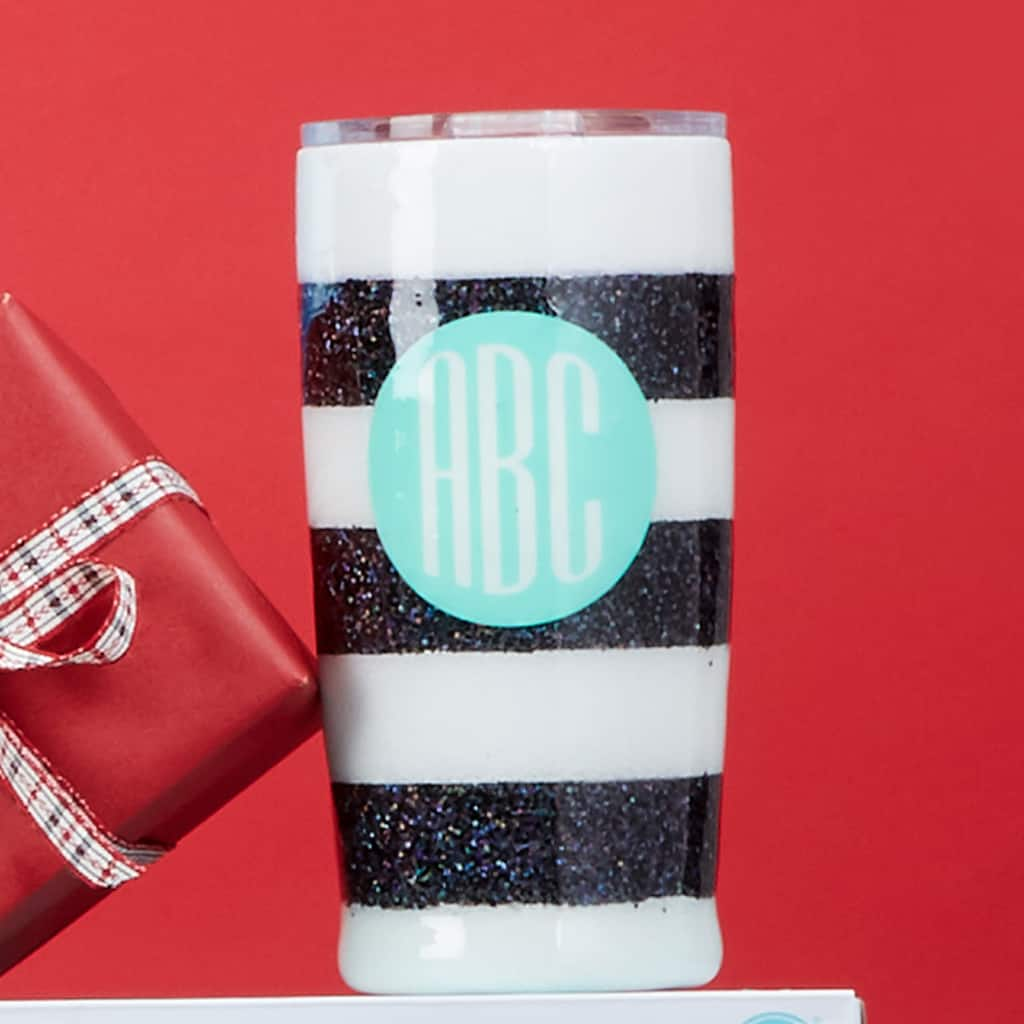
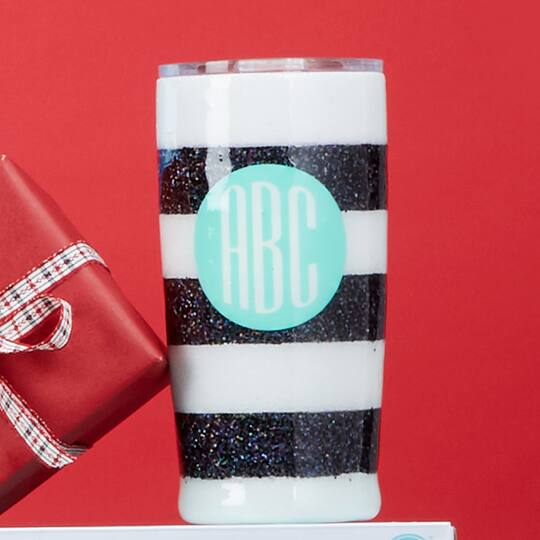
cricut® striped monogram tumbler
| Step 1 |
Remove the lid of your tumbler and set it aside. Paint the entire outside surface of your tumbler with white paint and let dry. Add another coat and set aside to dry. |
| Step 2 |
While your tumbler is drying, cut your vinyl. Click here for the design in Cricut® Design Space™. |
| Step 3 |
Now, click on ‘Shapes’ in the left panel and click the circle. Size it to 2½" [6.4 cm] and design your monogram within the circle. Slice out the monogram. Be sure to change the colour of your monogram so your Cricut® knows to prompt the colour change when cutting. |
| Step 4 |
Click ‘Make It’ in the upper right corner and then click ‘Continue’ in the lower right corner of your screen. |
| Step 5 |
Place your vinyl, grid-side down, onto your cutting mat and load it into your Cricut® machine. Select ‘Vinyl’ as your material and follow the prompts to cut. Once the machine has finished cutting, gently peel the vinyl away from your mat. |
| Step 6 |
Use scissors to cut away the vinyl around the cuts. |
| Step 7 |
Next, use your weeder tool to peel away the remaining negative space surrounding the strips, circle and monogram. |
| Step 8 |
Measure your tumbler, vertically, and determine how to evenly space your stripes. Use a pencil to lightly mark. |
| Step 9 |
Gently peel the vinyl strips, one at a time, from the backer paper and wrap around your tumbler where you want white stripes. Burnish the edges of the vinyl very well so it has a firm bond with the tumbler. |
| Step 10 |
Paint the exposed centre portion of your tumbler with black paint. Use a pouncing motion with a foam brush (included in the prep kit). Let dry and repeat for a thicker second coat. Let dry. |
| Step 11 |
Paint the black stripes with Mod Podge® and sprinkle a generous amount of black chunky glitter. Let dry. If needed, you can repeat this step to add more glitter. Let dry. |
| Step 12 |
Remove the vinyl over the white sections. Patch any white paint, if needed. Let dry. |
| Step 13 |
Repeat Step 15 with white extra fine white glitter over the white paint. |
| Step 14 |
Put on a pair of the gloves included in the prep kit and mix epoxy as noted in the directions. Mix only what is needed for one layer at a time. |
| Step 15 |
Place your tumbler onto the Spin It™ tool. Adjust the grip as needed for a snug fit. |
| Step 16 |
Turn on the tool to a slow speed and pour a little of your epoxy mixture onto your tumbler. Spread it evenly. Repeat until the entire tumbler is covered. Turn the speed up a little and run your gloves fingers over the cup in long even strokes to continue to spread the epoxy evenly. |
| Step 17 |
Allow your tumbler to spin on the Spin It™ tool for four hours. |
| Step 18 |
To add your monogram, cut a piece of transfer tape that’s just a bit larger than the monogram. Peel away the tape’s backer paper and place the tape, sticky-side down, over the vinyl. Burnish the vinyl so that it’s completely stuck to the tape. |
| Step 19 |
Gently peel the white backer paper from the cut-out monogram, which now should be stuck to the transfer tape. |
| Step 20 |
Hold the transfer tape with the design over the circle vinyl. Once it is lined up evenly, press together and burnish until they are bonded. Peel both up and hold your tumbler to determine where you’d like it placed, make sure it's exactly how you want it; then press it onto the surface. Burnish the vinyl once more to make sure it’s completely stuck to the surface and gently peel away the transfer tape, leaving the vinyl transferred to your tumbler. |
| Step 21 |
Mix another batch of epoxy (as in Step 18) and then repeat Steps 20-21 for a second layer. |
| Step 22 |
Set aside for 24 hours to allow the epoxy to completely cure. |
-
 20000797You’ll Need: 1Item # 10047539
Promotions
$5.99- Color: White
- Size: 4 oz
- Color: White
- Size: 4 oz
- Color: White
- Size: 4 oz
-
 20000629You’ll Need: 1Item # 10371004
Promotions
$1.99- Color: White
- Size: 2 oz
- Color: White
- Size: 2 oz
- Color: White
- Size: 2 oz
-
 20000629You’ll Need: 1Item # 10371081
Promotions
$1.99- Color: Black
- Size: 2 oz
- Color: Black
- Size: 2 oz
- Color: Black
- Size: 2 oz
Products
-

-

-

-

-
 928398715You’ll Need: 1Item # 10579868$11.99
- Color: Mint
- Size: 12" x 48"
- Color: Mint
- Size: 12" x 48"
- Color: Mint
- Size: 12" x 48"
Products
- Computer
| Step 1 |
Remove the lid of your tumbler and set it aside. Paint the entire outside surface of your tumbler with white paint and let dry. Add another coat and set aside to dry. |
| Step 2 |
While your tumbler is drying, cut your vinyl. Click here for the design in Cricut® Design Space™. |
| Step 3 |
Now, click on ‘Shapes’ in the left panel and click the circle. Size it to 2½" [6.4 cm] and design your monogram within the circle. Slice out the monogram. Be sure to change the colour of your monogram so your Cricut® knows to prompt the colour change when cutting. |
| Step 4 |
Click ‘Make It’ in the upper right corner and then click ‘Continue’ in the lower right corner of your screen. |
| Step 5 |
Place your vinyl, grid-side down, onto your cutting mat and load it into your Cricut® machine. Select ‘Vinyl’ as your material and follow the prompts to cut. Once the machine has finished cutting, gently peel the vinyl away from your mat. |
| Step 6 |
Use scissors to cut away the vinyl around the cuts. |
| Step 7 |
Next, use your weeder tool to peel away the remaining negative space surrounding the strips, circle and monogram. |
| Step 8 |
Measure your tumbler, vertically, and determine how to evenly space your stripes. Use a pencil to lightly mark. |
| Step 9 |
Gently peel the vinyl strips, one at a time, from the backer paper and wrap around your tumbler where you want white stripes. Burnish the edges of the vinyl very well so it has a firm bond with the tumbler. |
| Step 10 |
Paint the exposed centre portion of your tumbler with black paint. Use a pouncing motion with a foam brush (included in the prep kit). Let dry and repeat for a thicker second coat. Let dry. |
| Step 11 |
Paint the black stripes with Mod Podge® and sprinkle a generous amount of black chunky glitter. Let dry. If needed, you can repeat this step to add more glitter. Let dry. |
| Step 12 |
Remove the vinyl over the white sections. Patch any white paint, if needed. Let dry. |
| Step 13 |
Repeat Step 15 with white extra fine white glitter over the white paint. |
| Step 14 |
Put on a pair of the gloves included in the prep kit and mix epoxy as noted in the directions. Mix only what is needed for one layer at a time. |
| Step 15 |
Place your tumbler onto the Spin It™ tool. Adjust the grip as needed for a snug fit. |
| Step 16 |
Turn on the tool to a slow speed and pour a little of your epoxy mixture onto your tumbler. Spread it evenly. Repeat until the entire tumbler is covered. Turn the speed up a little and run your gloves fingers over the cup in long even strokes to continue to spread the epoxy evenly. |
| Step 17 |
Allow your tumbler to spin on the Spin It™ tool for four hours. |
| Step 18 |
To add your monogram, cut a piece of transfer tape that’s just a bit larger than the monogram. Peel away the tape’s backer paper and place the tape, sticky-side down, over the vinyl. Burnish the vinyl so that it’s completely stuck to the tape. |
| Step 19 |
Gently peel the white backer paper from the cut-out monogram, which now should be stuck to the transfer tape. |
| Step 20 |
Hold the transfer tape with the design over the circle vinyl. Once it is lined up evenly, press together and burnish until they are bonded. Peel both up and hold your tumbler to determine where you’d like it placed, make sure it's exactly how you want it; then press it onto the surface. Burnish the vinyl once more to make sure it’s completely stuck to the surface and gently peel away the transfer tape, leaving the vinyl transferred to your tumbler. |
| Step 21 |
Mix another batch of epoxy (as in Step 18) and then repeat Steps 20-21 for a second layer. |
| Step 22 |
Set aside for 24 hours to allow the epoxy to completely cure. |