


-

- About 30 minutes
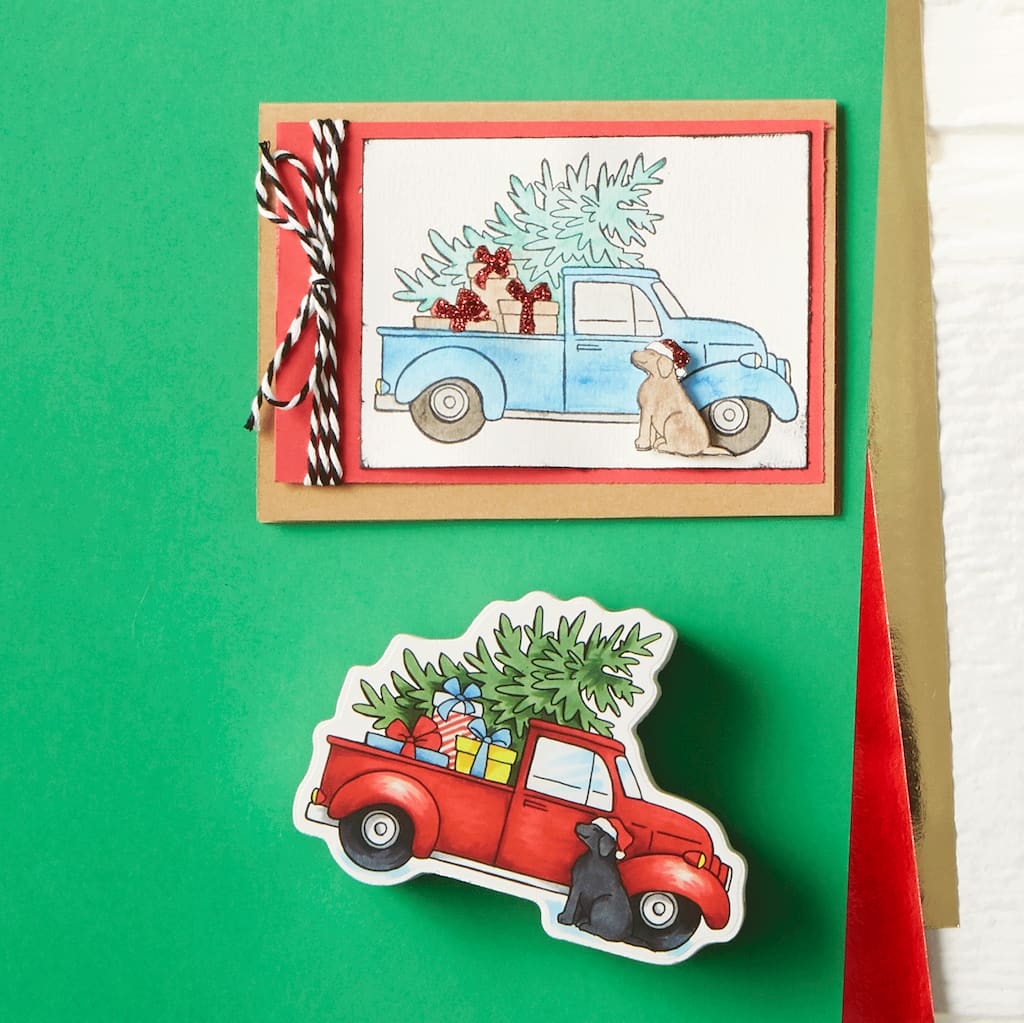
christmas tree in a truck christmas card
| Step 1 |
Stamp your image with StazOn® ink onto a piece of watercolour paper. Allow the ink to dry for a few minutes. |
| Step 2 |
Fill your aqua brush with water and add colour to your design with watercolour. |
| Step 3 |
Repeat step in another area on your watercolour paper. Use watercolour to paint the dog and his hat. Let watercolour dry completely. |
| Step 4 |
Cut out your first coloured image with your paper trimmer. The image should make about a 3" x 4" [7.62 cm x 10.16 cm] rectangle. |
| Step 5 |
Run your jet black ink pad along the edges of your watercolour paper. |
| Step 6 |
Cut a piece of red cardstock to 3¼" x 5" [8.9 cm x 12.7 cm]. Attach the watercolour rectangle to the right side of the cut red cardstock. |
| Step 7 |
Cut out the dog and his hat. |
| Step 8 |
Place two small dimensional squares on the back of your dog and place him over the dog in the coloured design. |
| Step 9 |
Use the two-way glue pen over the bows on the gifts in your image and your dog’s hat. Sprinkle glitter over the glue and shake off the excess. Set aside to dry. |
| Step 10 |
Wrap a long piece of jute around the left edge of the red rectangle and tie a bow. Trim the ends to desired length. |
| Step 11 |
Attach to the front of a kraft folded card. |
-

-
 You’ll Need: 1Item # 10122060
Promotions
$7.99 -
 You’ll Need: 1Item # 10179183
Promotions
$11.99 -
 809188578You’ll Need: 1Item # 10185468
Promotions
$7.49- Color: Garnet
- Size: 1.5 oz
- Color: Garnet
- Size: 1.5 oz
- Color: Garnet
- Size: 1.5 oz
-
 845166072You’ll Need: 1Item # 10189610
Promotions
$12.99- Color: White
- Size: 9" x 12"
- Color: White
- Size: 9" x 12"
- Color: White
- Size: 9" x 12"
-
 You’ll Need: 1Item # 10240417
Promotions
$9.99 -

-

Products
Products

- Paper Plate (or Palette Paper)
- 1 - Celebrate It® Baker's Twine – Black/White (SKU# 10480315)
| Step 1 |
Stamp your image with StazOn® ink onto a piece of watercolour paper. Allow the ink to dry for a few minutes. |
| Step 2 |
Fill your aqua brush with water and add colour to your design with watercolour. |
| Step 3 |
Repeat step in another area on your watercolour paper. Use watercolour to paint the dog and his hat. Let watercolour dry completely. |
| Step 4 |
Cut out your first coloured image with your paper trimmer. The image should make about a 3" x 4" [7.62 cm x 10.16 cm] rectangle. |
| Step 5 |
Run your jet black ink pad along the edges of your watercolour paper. |
| Step 6 |
Cut a piece of red cardstock to 3¼" x 5" [8.9 cm x 12.7 cm]. Attach the watercolour rectangle to the right side of the cut red cardstock. |
| Step 7 |
Cut out the dog and his hat. |
| Step 8 |
Place two small dimensional squares on the back of your dog and place him over the dog in the coloured design. |
| Step 9 |
Use the two-way glue pen over the bows on the gifts in your image and your dog’s hat. Sprinkle glitter over the glue and shake off the excess. Set aside to dry. |
| Step 10 |
Wrap a long piece of jute around the left edge of the red rectangle and tie a bow. Trim the ends to desired length. |
| Step 11 |
Attach to the front of a kraft folded card. |